Fertilizing your plants is essential for ensuring healthy growth and abundant yields. While there are numerous commercial fertilizers available, many gardeners prefer natural, homemade alternatives.
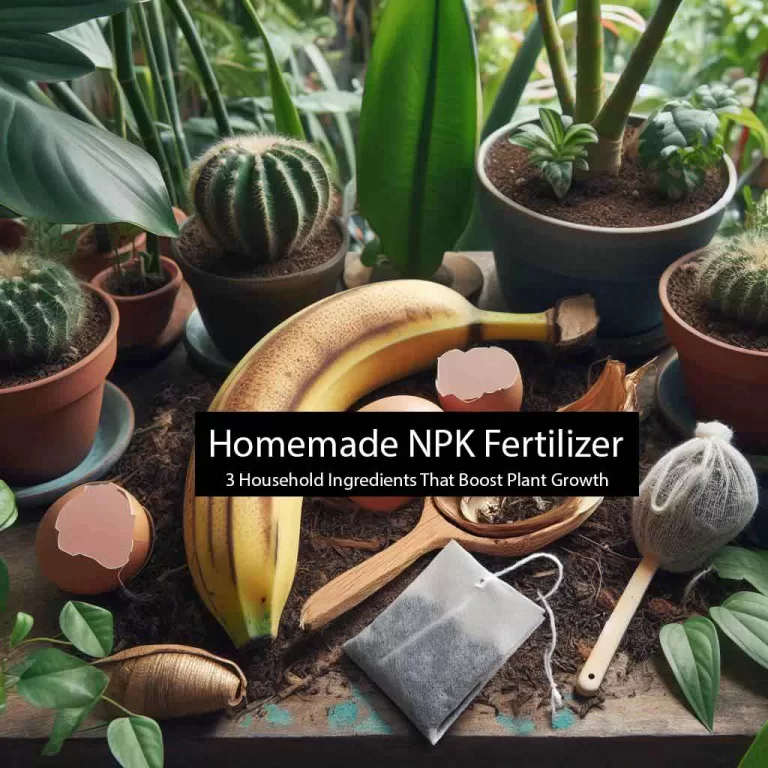
In this DIY guide, we’ll explore how to create NPK fertilizer using readily available household items like banana peels, tea bags, and eggshells.
Understanding NPK Fertilizer: NPK fertilizer contains three essential nutrients for plant growth: nitrogen (N), phosphorus (P), and potassium (K).
Each nutrient plays a vital role in different aspects of plant development. Nitrogen promotes leafy green growth, phosphorus encourages strong root development and flowering, while potassium aids in overall plant health and disease resistance.
Table of Contents
Ingredients:
- Banana Peels: Rich in potassium, banana peels are excellent for promoting flowering and fruiting in plants.
- Tea Bags: Used tea bags contain nitrogen and trace minerals beneficial for plant growth.
- Egg Shells: Eggshells provide calcium and small amounts of phosphorus, aiding in root development and overall plant health.
- Water: Acts as a carrier for nutrients and facilitates their absorption by plants.
Option 1 – Fermentation Method
Instructions:
- Collect Materials: Gather banana peels, used tea bags, eggshells, and a container for mixing.
- Prepare Ingredients:
- Banana Peels: Cut or tear the banana peels into small pieces to accelerate decomposition.
- Tea Bags: Open the used tea bags and empty the contents into the container.
- Egg Shells: Rinse the eggshells to remove any remaining egg white and crush them into small pieces. Crushing the eggshells increases their surface area, enhancing nutrient release.
- Mix Ingredients: Place the prepared banana peels, tea leaves, and crushed eggshells into the container. Add water to cover the ingredients completely.
- Allow Fermentation: Seal the container and let the mixture ferment for about 2-3 weeks. During this time, beneficial microbes break down the organic matter, releasing nutrients into the water.
- Strain the Solution: After fermentation, strain the liquid to remove solid residues. The resulting liquid is a nutrient-rich fertilizer ready for use.
- Application: Dilute the fertilizer with water before applying it to your plants. Use a ratio of 1 part fertilizer to 10 parts water for optimal results. Apply the diluted fertilizer to the soil around the base of your plants, avoiding direct contact with leaves to prevent burning.
Option 2 – Quick Preparation with Hot Water
If you’re short on time and need to prepare NPK fertilizer quickly, you can opt for this expedited method using hot water. Follow these steps for rapid NPK solution creation:
- Gather Ingredients: Collect your banana peels, used tea bags, and eggshells. Ensure they are clean and free from any contaminants.
- Prepare Ingredients:
- Banana Peels: Cut or tear the banana peels into small pieces to increase surface area and facilitate nutrient release.
- Tea Bags: Open the used tea bags and empty the contents into a heat-resistant container.
- Egg Shells: Crush the cleaned eggshells into small pieces. Crushing them aids in nutrient extraction.
- Boil Water: Heat water to near boiling point. You can use a kettle or stovetop for this purpose. Ensure there is enough water to cover all the ingredients adequately.
- Combine Ingredients: Place the prepared banana peels, tea leaves, and crushed eggshells into a heat-resistant container. Pour the hot water over the ingredients, ensuring they are fully submerged.
- Let it Steep: Allow the mixture to steep in the hot water at least 1 hour. During this time, the hot water will help extract nutrients from the organic matter, creating a potent fertilizer solution.
- Cool and Strain: Allow the solution to cool to room temperature. Once cooled, strain the liquid to remove solid residues, leaving behind a nutrient-rich fertilizer solution.
- Dilute and Apply: Dilute the concentrated fertilizer solution with water before applying it to your plants. Use a ratio of 1 part fertilizer solution to 10 parts water for optimal results. Apply the diluted fertilizer to the soil around the base of your plants, avoiding direct contact with leaves.
While this method offers a quicker alternative to fermentation, keep in mind that the nutrient extraction process may not be as thorough as with fermentation. However, it still provides a convenient way to create homemade NPK fertilizer when time is limited.

Benefits of Homemade NPK Fertilizer:
- Cost-Effective: Making your own fertilizer from household items saves money compared to purchasing commercial products.
- Environmentally Friendly: By recycling kitchen waste like banana peels and eggshells, you reduce landfill waste and promote sustainability.
- Nutrient-Rich: Homemade NPK fertilizer provides a balanced blend of essential nutrients, promoting healthy plant growth without harmful chemicals.
- Customizable: You can adjust the nutrient content of the fertilizer by varying the proportions of ingredients used, catering to the specific needs of your plants.
Conclusion:
Creating NPK fertilizer from banana peels, tea bags, and eggshells is a simple and sustainable way to nourish your plants naturally.
By following this DIY guide, you can harness the power of household waste to enrich your garden soil, leading to vibrant, thriving plants and bountiful harvests.
Embrace the eco-friendly approach to gardening and watch your plants flourish with homemade goodness.
FAQs (Frequently Asked Questions) About Homemade NPK Fertilizer
- Why should I make my own NPK fertilizer instead of buying commercial products?
- Making your own fertilizer allows you to control the ingredients and avoid synthetic chemicals. It’s also a cost-effective and environmentally friendly way to recycle kitchen waste.
- How often should I apply homemade NPK fertilizer to my plants?
- The frequency of application depends on the specific needs of your plants and the growth stage. As a general guideline, apply the fertilizer every 2-4 weeks during the growing season, but adjust based on plant response and soil conditions.
- Can I use this homemade fertilizer for all types of plants?
- Yes, you can use homemade NPK fertilizer for a wide variety of plants, including vegetables, fruits, flowers, and ornamentals. However, it’s essential to dilute the fertilizer properly and monitor plant reactions, as some sensitive plants may require gentler formulations.
- How long does it take for the homemade fertilizer to show results?
- The timing of results can vary depending on factors such as plant species, soil conditions, and application frequency. Generally, you may start noticing improvements in plant growth, vigor, and fruiting within a few weeks to a month of regular application.
- Can I store the homemade NPK fertilizer for future use?
- Yes, you can store the liquid fertilizer in a sealed container in a cool, dark place for several months. However, it’s essential to check for any signs of spoilage, such as foul odor or mold growth, before using it. If the fertilizer appears compromised, it’s best to discard it and make a fresh batch.
- Is it necessary to ferment the ingredients, or can I use them fresh?
- Fermenting the ingredients helps break down organic matter and release nutrients more readily. While you can use fresh ingredients, fermenting them enhances the effectiveness of the fertilizer and ensures better nutrient availability for plants.
- Will homemade NPK fertilizer burn my plants if applied incorrectly?
- When properly diluted, homemade NPK fertilizer is unlikely to burn plants. However, it’s essential to follow the recommended dilution ratios and avoid direct contact with plant foliage, especially when applying concentrated solutions, to prevent potential damage.
- Can I combine homemade NPK fertilizer with other organic amendments or fertilizers?
- Yes, you can incorporate homemade NPK fertilizer into your overall organic gardening regimen. It can be used alongside compost, mulch, and other organic amendments to promote soil health and plant nutrition. Just ensure that you’re not overloading the soil with nutrients and maintain a balanced approach to fertilization.